This spooky spider cake is so easy to make and decorate! I’ll show you how to turn a box of cake mix, frosting, and Oreo cookies into an adorable mini Halloween cake decorated with cobwebs and spiders.
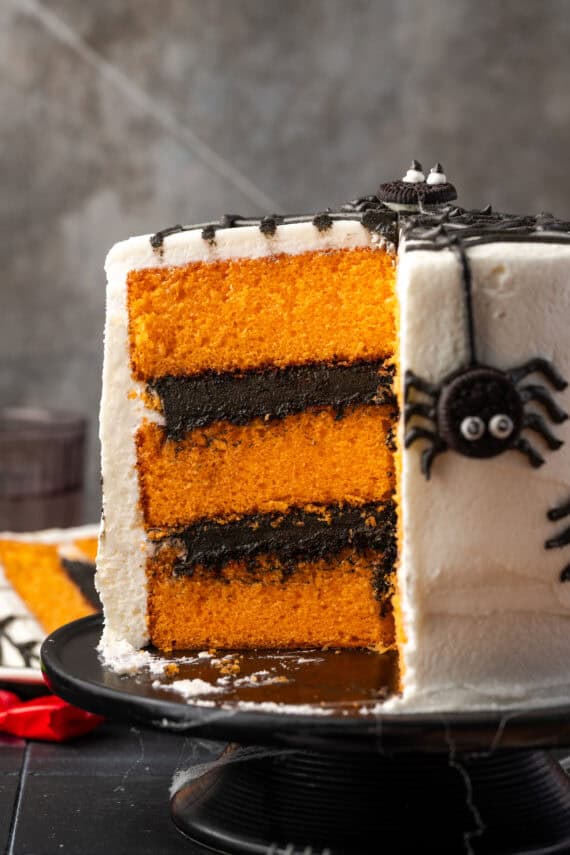
This Halloween spider cake has bright orange layers frosted with creamy vanilla and chocolate buttercream, decorated with a frosting spider web design and adorable Oreo spiders. It looked so cute and it was surprisingly easy to make!
Of course, it helped to start with a box of cake mix, which cut down on the prep time. Here’s why I love this tutorial:
It’s fun and easy. You don’t need to be a master cake decorator to turn a simple layer cake into a spooky spider cake. This tutorial uses just two colors of frosting and an easy piping technique to create the “web” pattern. It’s great if you’re just getting the hang of piping frosting.
No fancy equipment. You don’t even need a piping bag or piping tips. A Ziplock bag with the corner snipped works perfectly here!
Perfect for the spooky season. I love this 6-inch cake because it’s perfect for Halloween parties, but it’s also a fun design for a spider-themed birthday cake. You can get creative decorating this cake with Halloween candy, cookies, and more to really make it your own.
What You’ll Need
Below are some notes on what you’ll need to make and decorate a spider cake this Halloween.
Cake Mix – Choose your favorite brand of boxed white or yellow cake mix. Or, use your favorite homemade recipe to make and bake the cakes from scratch.
Food Coloring – Orange food dye for coloring the cake, and black food dye for coloring the frosting. I recommend food coloring gels as they’re more potent. A little goes a long way.
Frosting – I use my perfect vanilla buttercream to frost the cake and a can of store-bought chocolate frosting with black food dye mixed in for the spider web details. You could also make a batch of my homemade chocolate buttercream. Another option is to use ready-made black decorating icing, like the kind from Wilton.
Oreos – I used Mini Oreos for the spider bodies. You could use any small, dark cookie for this.
How to Make a Spider Cake (Step-By-Step)
Now, we’ll bake up our cake layers before we frost and decorate our spider cake. This tutorial is easy, and the spider web design is a great way to get in some piping practice!
First, Bake the Cake
I take a shortcut with a box of cake mix for this recipe, but you can absolutely bake three 6” layers of your favorite homemade yellow cake if you prefer. Here’s what to do:
Mix and color the cake batter.Fill the cake pans and bake.
Make the batter. First, mix up your cake batter according to the directions on the box or following your preferred recipe. Afterward, stir in a few drops of orange food coloring.
Bake the cakes. Divide the batter evenly between three greased 6” cake pans, and bake. Easy peasy!
Next, Assemble the Cake
After baking, you’ll need to let the cakes cool completely before you frost them. Otherwise, fresh buttercream will slide right off the warm cake. Allow the cakes to come to room temperature, then assemble your layer cake as follows:
Pipe a frosting border over the first cake layer.Fill the border with chocolate frosting.
Start with the first cake layer. Place your first cake layer on a plate. I like to dollop a bit of frosting underneath to hold the cake in place. Then, use a large open-round piping tip (or a Ziploc bag with the corner snipped off) to pipe a thick vanilla buttercream border around the outside of the cake as pictured.
Fill the cake. Next, use an offset spatula to spread dark chocolate frosting inside the vanilla frosting border. Place the second cake layer over top, and repeat.
Stack the cake layers.Frost the top and sides of the cake.
Frost the outside of the cake. With your third and final cake layer stacked, use the remaining vanilla frosting to cover the top and sides of the cake.
How to Decorate a Spider Cake
Last but not least, here’s how to decorate the frosted layer cake with a fun, spooky cobweb and Oreo spiders!
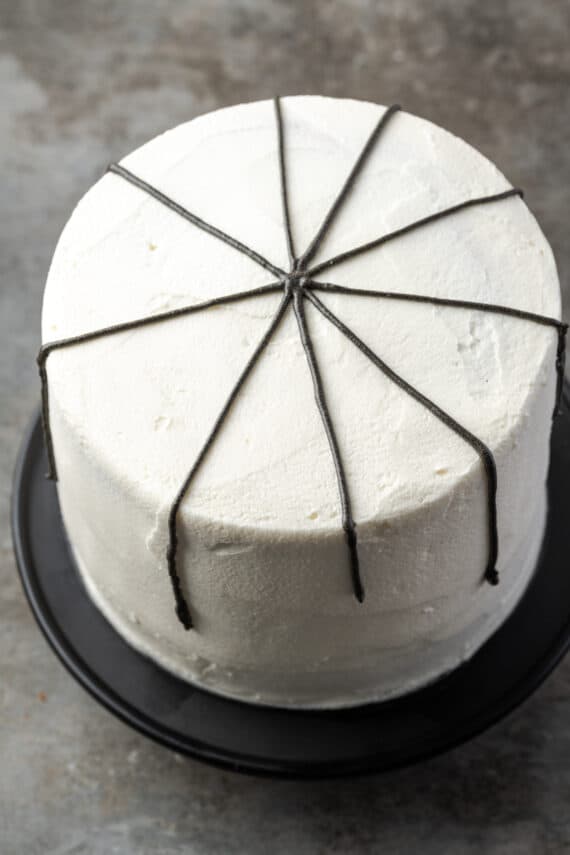
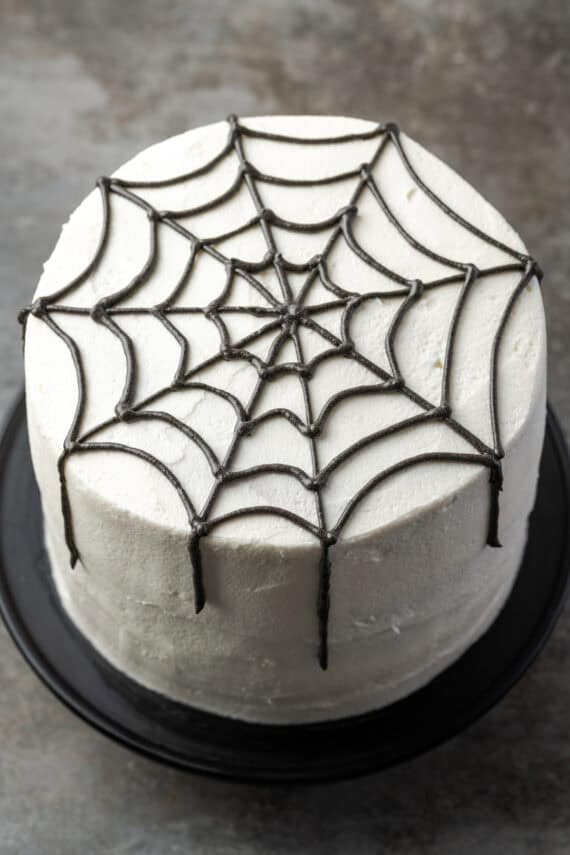
Pipe the spider web. I used a piping bag fitted with a #4 small round decorating tip and filled it with black frosting. Working slowly, pipe the frosting in a web pattern over the top of the cake. I extended the web down the side of the cake so my “spiders” could dangle!
Press Oreos into the frosted cake.Decorate the Oreos to look like spiders.
Add the spiders. Press Mini Oreos into the cake, at the ends of the “web” or as you see fit. Use the leftover white and black frosting to add the spiders’ legs and eyes.
Decorating Tips
Do a practice round. If you’re a beginner when it comes to piping frosting, do a few “practice runs” on a large sheet of parchment paper first. You can get the hang of moving the piping tip to create the web pattern before you take your newfound skills to the cake.
Add more decorations. You can be as creative or as simple as you like when it comes to decorating a spider cake. Instead of Oreos, make colorful spiders with Lifesaver candies, add gummy bugs to the web, or add Halloween-themed sprinkles for a pop of orange and black. The sky’s the limit.
It doesn’t have to be perfect. If you make a mistake, don’t worry. You can always cover any gaps with an Oreo spider, more frosting, or some extra candy or decorations (see above). Remember, your spider cake will taste delicious no matter what!
Storing a Spider Cake
To store. Once this cake is frosted, you’ll want to keep it covered in a cake carrier, or a similar airtight container. It’s fine to store at room temperature for 1-2 days, granted your kitchen isn’t hot or humid. Otherwise, keep the cake in the fridge and bring it to room temperature for serving.
Freeze. I don’t recommend freezing the frosted cake, however, you can bake the cake layers ahead to store and freeze. Wrap the cooled cakes tightly in a double layer of plastic wrap and freeze them for up to 1 month. Thaw the cakes completely before assembling and frosting.
This spider cake is so easy to make and decorate! This tutorial turns a box of cake mix, frosting, and Oreo cookies into a fun Halloween cake decorated with cobwebs and spiders.
1 box yellow cake mix (plus the ingredients listed on the box)
Grease three 6-inch cake pans with cooking spray, and set aside.
Prepare the cake batter according to the directions on the box. Use orange food coloring gel to color the batter orange.
Divide the batter evenly between the prepared cake pans and bake the cakes according to the package directions. Let the cakes cool completely.
To Assemble
Prepare a batch of vanilla buttercream frosting. Color the canned chocolate frosting black using black food coloring gel.
Place your first cake layer on a plate. Using a large open-round piping tip, pipe a border of vanilla buttercream around the outside edge of the cake.
Fill the vanilla buttercream border with black frosting using an offset spatula. Place the second cake layer on top and repeat, then add the third and final layer.
Once the cake is filled and stacked, use the remaining vanilla frosting to frost the top and sides of the cake.
To Decorate
Add black frosting to a piping bag fitted with a #4 decorating tip. Pipe the frosting in a web pattern over the top of the cake, extending the web lines down the side of the cake. These will be the “strands” where the spiders can dangle.
Press Mini Oreos into the cake as desired. Afterward, use leftover white and black frosting to pipe the legs and eyes.